
Architectural shingles are one of the most widely used roofing materials for residential buildings, but choosing the right size is not as simple as looking at the length and width of one shingle. Their dimensions, exposure, coverage, thickness, bundle quantity, and installation layout all affect how they perform on a roof. If you are planning a new roof, replacing damaged shingles, or estimating how much material a project will require, understanding architectural shingle dimensions can make the process much easier.
An architectural shingle size chart provides a convenient starting point for comparing common dimensions and coverage characteristics. Unlike older three-tab shingles, architectural shingles have a dimensional appearance created by multiple layers of asphalt material. Their actual measurements can vary slightly between products, so the published dimensions should always be treated as product-specific rather than universal.
This guide explains common architectural shingle sizes, standard dimensions, exposure, coverage, bundle considerations, thickness, weight, and installation measurements. It also explains how architectural shingles compare with three-tab shingles and what to consider when selecting shingles for a particular roof.
What Are Architectural Shingles?
Architectural shingles are laminated asphalt roofing shingles designed with multiple layers rather than the relatively flat, uniform construction of traditional three-tab shingles. The additional layers create a dimensional surface that can resemble natural materials such as wood shakes or slate while remaining relatively straightforward to install.
They are commonly used on residential roofs because they combine a familiar asphalt-shingle installation method with a more substantial visual appearance. The layered construction also gives the roofing surface a varied pattern instead of the repeated rectangular appearance associated with three-tab shingles.
The term “architectural” describes the construction and appearance of the shingle rather than one universal measurement. For this reason, two architectural shingle products can have slightly different dimensions even though both are sold under the same general category.
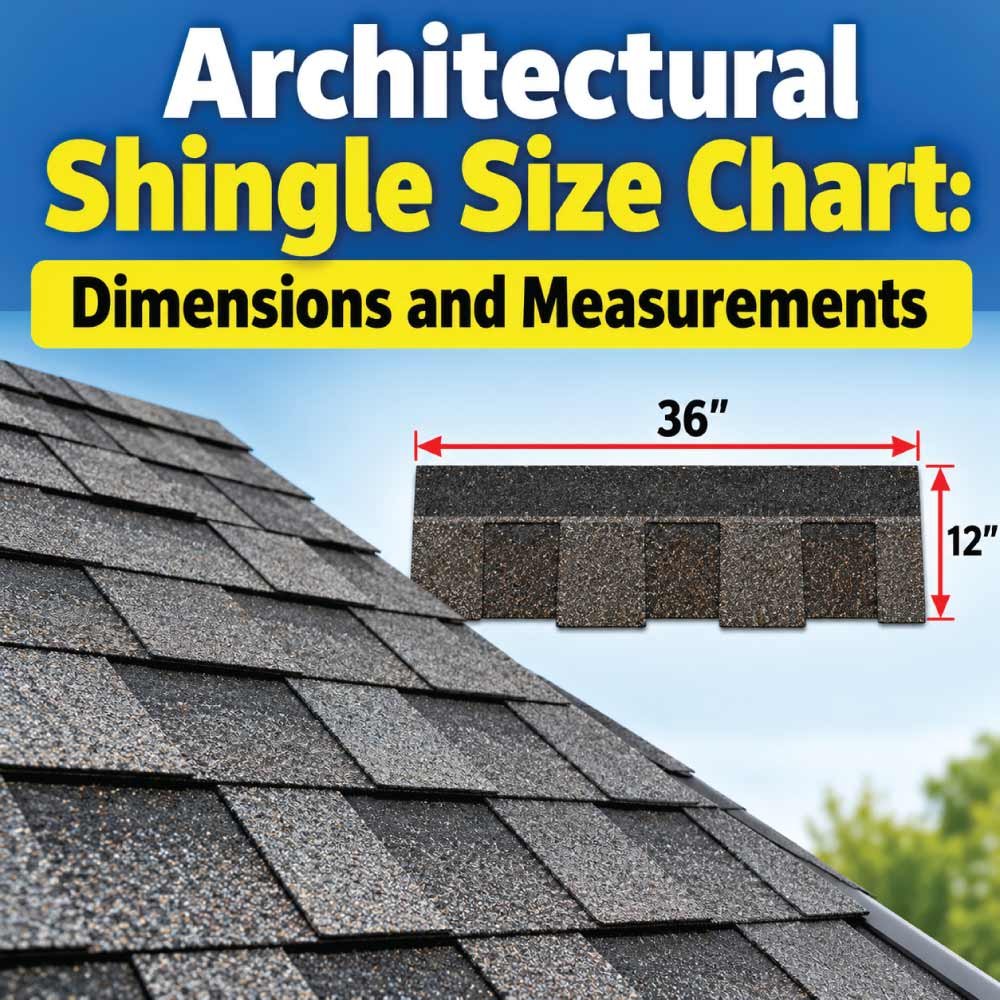
A typical architectural shingle is roughly 12 inches wide and around 36 to 40 inches long, although exact dimensions vary. The portion visible after installation is considerably smaller than the full shingle length because part of the shingle is covered by the course above it.
Why Architectural Shingle Dimensions Matter
Shingle dimensions affect much more than appearance. They influence material calculations, roof layout, waste, installation, and the finished pattern.
Before purchasing shingles, it helps to understand several measurements:
- Overall shingle length
- Overall shingle width
- Shingle exposure
- Headlap
- Course spacing
- Coverage per shingle
- Number of shingles per bundle
- Bundles required per roofing square
- Shingle thickness
- Weight per bundle or square
These measurements work together. For example, knowing that a shingle is approximately 36 inches long does not tell you how much roof area it covers. The installed exposure determines how much of that shingle remains visible and contributes to the roof surface.
This is particularly important when estimating quantities. A roof may require additional shingles for starter courses, hips, ridges, valleys, cut pieces, and installation waste.
Architectural Shingle Size Chart
The following chart shows common dimensional ranges for architectural asphalt shingles. Because manufacturers and product lines differ, these figures should be used as general reference ranges rather than as a substitute for the dimensions printed for a specific product.
| Measurement | Common Architectural Shingle Range |
|---|---|
| Overall length | About 36–40 in. |
| Overall width | About 12–14 in. |
| Typical installed exposure | About 5–7 in. |
| Typical shingle thickness | Approximately 0.10–0.15 in. or more, depending on construction |
| Shingles per bundle | Varies by product |
| Bundles per roofing square | Commonly 3 or 4, depending on product |
| Coverage per square | 100 sq. ft. |
| Typical design | Laminated, dimensional |
| Typical application | Residential sloped roofs |
The most important point is that 100 square feet refers to a roofing square, not to the physical size of an individual shingle. Roofing professionals commonly use the square as a convenient measurement for estimating roofing materials.
A manufacturer’s package may contain a different number of shingles or provide a different coverage area depending on the product’s design.
Understanding Architectural Shingle Length and Width
The overall dimensions are the easiest measurements to understand, but they are not necessarily the measurements that determine installed coverage.
Shingle Length
Architectural shingles are commonly around three feet long. The exact length can differ from one product to another.
Length matters during installation because shingles are arranged in horizontal courses across the roof. The shingle’s width, installation offset, and exposure determine how the courses overlap and align.
Longer shingles can cover more horizontal distance per piece, but this does not automatically mean they require fewer total shingles. The actual quantity depends on the manufacturer’s installation pattern and the amount of each shingle exposed.
Shingle Width
Many architectural shingles are approximately one foot wide, with some products being somewhat wider or narrower.
Width affects the number of shingles required across a roof section. However, roofers generally calculate material using the manufacturer’s coverage information rather than simply dividing roof area by the physical dimensions of one shingle.
That approach is more reliable because the shingle’s actual installed coverage accounts for overlapping courses and the intended installation pattern.
What Is Shingle Exposure?
Exposure is the portion of a shingle that remains visible after the next course has been installed over it.
This is one of the most important measurements in an architectural shingle installation.
Imagine a shingle that is about 39 inches long. You cannot assume that the entire 39 inches contributes to the finished roof surface. A substantial portion is covered by the course above it. If the specified exposure is around 5 to 7 inches, only that exposed portion contributes to the visible pattern.
Exposure affects:
- The number of courses required
- Roof appearance
- Material coverage
- Course alignment
- Installation layout
- The amount of overlap between shingles
Following the intended exposure is important because changing it can alter the manufacturer’s designed coverage and installation pattern.
A smaller exposure generally means more courses are needed across the same roof slope. A larger exposure means fewer courses may be needed, but the shingle must still be installed according to its specified requirements.
Architectural Shingle Headlap and Overlap
Headlap refers to the amount by which one course of shingles overlaps the course below it. This overlap is a fundamental part of the roofing system because it helps create multiple layers across the roof surface.
The exact headlap depends on the shingle design and installation instructions. It should not be assumed solely from the shingle’s overall length.
Architectural shingles also use side laps and staggered placement to prevent unwanted vertical seams from lining up between adjacent courses. The resulting pattern contributes to the dimensional appearance of the finished roof.
Because different products have different designs, nail zones, cut patterns, and installation requirements, the precise overlap should come from the specifications for the particular shingle being installed.
How Many Architectural Shingles Are in a Bundle?
There is no single universal number of shingles in an architectural shingle bundle.
Manufacturers package shingles according to the product’s weight, dimensions, coverage, and design. One bundle may contain a different number of individual shingles from another while still being intended to cover a similar general area.
For estimating purposes, the more useful figure is usually the coverage stated for the bundle, rather than the number of individual shingles.
A common roofing convention is that three or four bundles cover approximately one roofing square, but this is not true for every architectural shingle product. Some heavier or specialty products can have different packaging requirements.
Always check:
- Coverage per bundle
- Number of bundles per square
- Total squares covered by the purchased quantity
- Whether separate starter and ridge materials are required
This prevents a common mistake: assuming that every bundle contains enough material for exactly one-third of a square.
How Many Architectural Shingles Are Needed Per Square?
A roofing square represents 100 square feet of roof area. The number of individual shingles needed to cover a square depends on the product’s dimensions, exposure, and packaging.
For this reason, it is better to calculate roofing material using the product’s stated coverage rather than trying to determine the quantity from the shingle’s overall length and width alone.
For example, if a product is packaged so that three bundles cover one square, a 20-square roof would require approximately 60 bundles before accounting for waste and additional materials.
The final order may need more because roof shapes are rarely perfect rectangles. Valleys, dormers, hips, ridges, penetrations, and cut edges can increase material requirements.
How to Calculate Architectural Shingle Quantities
Calculating the basic roof area is straightforward, but turning that area into a final material order requires several steps.
Step 1: Measure Each Roof Plane
Measure the length and horizontal width of each roof section. For a simple rectangular roof plane:
Roof area = length × width
Calculate each separate plane and add the results together.
Step 2: Account for Roof Slope
If measurements are taken horizontally rather than directly along the roof surface, the roof pitch affects the actual surface area.
A steep roof has more surface area than a flat horizontal projection of the same dimensions. Roofers therefore use the appropriate slope factor when converting horizontal measurements into actual roof area.
Step 3: Convert the Area Into Roofing Squares
Divide the total roof surface area by 100.
For example:
2,400 square feet ÷ 100 = 24 roofing squares
The roof would therefore contain approximately 24 squares before waste and additional roofing components are considered.
Step 4: Add a Reasonable Waste Allowance
Some material will be lost through cutting, trimming, damaged pieces, and complex roof geometry. The appropriate allowance depends on the shape and complexity of the roof.
A simple roof generally produces less waste than a roof with numerous valleys, hips, dormers, angles, and penetrations.
Step 5: Calculate Bundles
Finally, use the product’s stated bundles-per-square figure to determine the approximate number of bundles required.
Do not rely on a generic bundle count if the packaging information for the selected product provides a different coverage rate.
Architectural Shingle Thickness and Weight
Architectural shingles are generally more substantial than basic three-tab shingles because they are made from laminated layers.
Thickness can vary significantly by product. Some architectural shingles have additional layers, heavier reinforcement, or enhanced dimensional profiles. These differences can affect both the visual depth and the overall weight of the roofing material.
Weight is commonly expressed by bundle or by roofing square. A heavier architectural shingle is not automatically appropriate for every project, because the roof structure and existing roofing system also need to be considered.
When comparing products, look beyond thickness alone. Consider:
- Overall construction
- Intended application
- Warranty terms
- Installation requirements
- Roof design
- Local climate
- Existing roof layers
- Structural considerations
The exact product specification should always take priority over a generic architectural shingle size chart.
Architectural Shingles vs. Three-Tab Shingles
Architectural and three-tab shingles are both asphalt roofing products, but their construction and appearance are different.
| Feature | Architectural Shingles | Three-Tab Shingles |
|---|---|---|
| Construction | Laminated layers | Generally single-layer construction |
| Appearance | Dimensional and varied | Flat and uniform |
| Typical visual depth | Greater | Lower |
| Individual tab pattern | Irregular or layered | Repeating tabs |
| Weight | Often higher | Often lower |
| Design flexibility | Broad range of dimensional patterns | More uniform appearance |
| Installation method | Overlapping courses | Overlapping courses |
| Dimensions | Vary by product | Vary by product |
The distinction matters when replacing an existing roof. A homeowner should not assume that an architectural shingle can be substituted for a three-tab product without checking the roof’s installation requirements.
The two styles can also produce noticeably different finished appearances even when their general dimensions are similar.
Also Read:
Common Architectural Shingle Profiles and Styles
Architectural shingles are available in many visual designs. Their dimensions may be similar, but the appearance of the exposed portion can vary considerably.
Standard Dimensional Shingles
These use multiple laminated layers to create depth and shadow lines. They are common on residential roofs and are available in many colors and patterns.
Luxury or Premium Shingles
Premium architectural products can have heavier construction and more elaborate patterns designed to imitate natural roofing materials. Their dimensions and coverage can differ from standard architectural shingles.
Wood-Look Architectural Designs
Some shingles use layered shapes and color variation to create an appearance inspired by wood shakes. The exposed pattern is especially important with these products because the roof layout contributes significantly to the final visual effect.
How Roof Pitch Affects Shingle Measurements
Roof pitch describes how steeply the roof rises compared with its horizontal run. Pitch does not normally change the physical dimensions of the shingle, but it changes how much roof surface must be covered.
Consider two roof sections with the same horizontal footprint. The steeper roof has a larger actual surface area.
Pitch can also affect the installation approach. Low-slope and steep-slope roofs may have different material and installation considerations, and the appropriate roofing system must be selected for the roof’s design.
For material estimation, measuring the actual roof surface or correctly applying the appropriate slope factor is more important than simply measuring the building footprint.
Also Read:
How Architectural Shingle Layout Works
Architectural shingles are installed in courses, with each course overlapping the one below it. The shingles are normally offset so that vertical joints do not form continuous lines across the roof.
A typical installation sequence involves:
- Preparing the roof deck.
- Installing the appropriate underlayment and other required components.
- Establishing the starter course.
- Installing the field shingles in successive courses.
- Maintaining the specified exposure and stagger.
- Cutting shingles around roof features.
- Installing appropriate ridge and hip materials.
The exact procedure varies according to roof design and product requirements.
The starter course is particularly important because it establishes the lower edge of the shingle field and helps protect the roof’s vulnerable eave area. Starter products may have different dimensions from standard field shingles.
Architectural Shingle Sizes for Different Roof Areas
Not every part of a roof uses the same type of roofing piece.
| Roof Area | Typical Roofing Material |
|---|---|
| Main roof field | Architectural field shingles |
| Lower roof edge | Starter shingles |
| Ridges | Ridge-cap shingles |
| Hips | Hip/ridge-cap material |
| Valleys | Valley-specific roofing system |
| Roof penetrations | Flashing and compatible roofing materials |
This distinction is important when creating a material list. Buying only enough field shingles to cover the calculated roof area does not necessarily provide everything needed to complete the roof.
Ridge and hip areas require specially shaped pieces or appropriately prepared shingles. Valleys and penetrations require careful detailing because they are areas where water management is particularly important.
Also Read:
Factors That Can Change the Required Shingle Quantity
Two roofs with exactly the same calculated surface area can require different quantities of shingles.
The main factors include:
- Roof complexity
- Number of roof planes
- Valleys
- Hips
- Dormers
- Skylights
- Chimneys
- Vents
- Roof penetrations
- Cutting requirements
- Starter courses
- Ridge and hip requirements
- Product-specific installation pattern
A simple gable roof is relatively efficient because large rectangular sections can be covered with fewer cuts. A complicated roof may produce considerably more offcuts.
This is why a roof-material estimate based solely on square footage is useful for a preliminary calculation but may not represent the final quantity needed for installation.
Common Mistakes When Measuring Architectural Shingles
Using the Overall Shingle Size as Its Coverage
A shingle that is approximately 39 inches long does not cover a 39-inch-long section of roof by itself. Overlap reduces the visible coverage.
Assuming Every Bundle Covers the Same Area
Bundle coverage varies. Always use the coverage printed for the specific product.
Ignoring Roof Pitch
Measuring the building footprint without accounting for roof slope can underestimate the actual roof surface.
Forgetting Starter and Ridge Materials
Field shingles are only one component of a complete roofing system.
Ignoring Waste
Cuts around hips, valleys, walls, chimneys, and other features can create significant offcuts.
Mixing Installation Patterns
Architectural shingles often require a specified stagger or offset. Changing the pattern can affect appearance and coverage.
Relying on Generic Dimensions
A general architectural shingle size chart is useful for understanding the category, but the actual product packaging and installation specifications should control the final estimate.
How to Choose the Right Architectural Shingle Size
Size alone should not determine the product you choose. Start with the roof itself and then consider the shingle’s coverage and installation requirements.
Look at these factors:
Roof dimensions: Know the approximate surface area and slope.
Product coverage: Determine how much area each bundle covers.
Roof complexity: Allow for additional cutting and waste on complicated roofs.
Existing materials: If reroofing, determine whether the existing roofing layers affect the planned installation.
Visual pattern: Different architectural shingles create different shadow lines and textures.
Weight: Consider whether the roof structure and existing assembly are appropriate for the selected material.
Installation requirements: Make sure the product is suitable for the roof slope and planned installation method.
Climate exposure: Wind, rain, snow, temperature changes, and sunlight can influence the type of roofing system appropriate for a building.
Tips for Measuring a Roof Before Buying Shingles
If you are preparing a preliminary material estimate, organize your measurements rather than trying to calculate everything at once.
Write down the dimensions of every roof plane separately. Label each section so you can identify it later. Then calculate each area and add them together.
For a straightforward roof, the process may look like this:
- Measure the first roof plane.
- Calculate its area.
- Measure the second plane.
- Calculate its area.
- Add all roof-plane areas.
- Adjust for pitch if necessary.
- Convert the total into roofing squares.
- Add an appropriate waste allowance.
- Determine bundles using the selected product’s coverage.
- Add starter, ridge, hip, and other required materials.
For complicated roofs, a professional measurement can reduce the chance of ordering too little or too much material.
Architectural Shingle Measurement Terms at a Glance
| Term | Meaning |
|---|---|
| Overall length | Full length of the shingle before installation |
| Overall width | Full width of the shingle |
| Exposure | Portion visible after installation |
| Headlap | Overlap between successive courses |
| Roofing square | 100 square feet of roof area |
| Bundle | Packaged quantity of shingles |
| Starter course | First shingle course installed along the lower roof edge |
| Field shingle | Main shingle used across the roof |
| Ridge cap | Roofing piece used along a roof ridge |
| Hip | External angled intersection of two roof slopes |
| Valley | Internal intersection where roof slopes meet |
Understanding these terms makes architectural shingle packaging and installation information much easier to interpret.
Frequently Asked Questions About Architectural Shingle Sizes
What is the standard size of an architectural shingle?
There is no single universal standard size. Many architectural shingles are roughly 36 to 40 inches long and about 12 to 14 inches wide, but actual dimensions vary by product.
How many architectural shingles cover 100 square feet?
A roofing square covers 100 square feet, but the number of individual shingles required depends on the product’s dimensions and exposure. Manufacturers generally provide bundle coverage, which is more useful for estimating.
How many bundles of architectural shingles are in a square?
Many products use three or four bundles per roofing square, but this is not universal. Always check the coverage information for the specific shingle.
Are architectural shingles larger than three-tab shingles?
Not necessarily. Their overall dimensions can be similar, but architectural shingles differ primarily in their laminated construction and dimensional appearance.
What is the typical exposure of an architectural shingle?
Many architectural shingles have an exposure in the general range of about 5 to 7 inches, but the specified exposure depends on the particular product and installation method.
Can architectural shingles be used on any roof?
No. Roofing materials have application requirements related to slope, installation method, deck condition, climate, and other factors. The selected product should be appropriate for the specific roof.
Does shingle size affect roof appearance?
Yes. Overall dimensions, exposure, stagger, cut pattern, and the shape of the exposed portion all influence the final appearance. Architectural shingles are specifically designed to create a layered, dimensional effect.
How much extra material should I buy?
The appropriate allowance depends on the roof’s size and complexity. Simple roofs generally require fewer cuts, while roofs with numerous valleys, hips, dormers, and penetrations can require more material. The estimate should account for the roof layout rather than applying an arbitrary amount in every situation.
Final Thoughts on Architectural Shingle Dimensions
An architectural shingle size chart is useful for understanding the general dimensions and terminology associated with dimensional asphalt roofing, but the physical size of a shingle is only one part of the calculation. Overall length and width, exposure, overlap, bundle coverage, roof pitch, and roof complexity all influence how many shingles are actually required.
For a quick reference, many architectural shingles fall somewhere around 36 to 40 inches in length and 12 to 14 inches in width, with an installed exposure commonly around 5 to 7 inches. These figures are helpful for planning, but they should never replace the exact measurements and coverage information provided for the selected product.
If you are estimating a roofing project, begin with accurate roof measurements, account for slope and complexity, convert the surface area into roofing squares, and then use the selected shingle’s actual bundle coverage. Remember to include starter materials, ridge or hip components, valley details, and reasonable allowance for cutting and waste.
The goal is not simply to find a shingle that fits a particular measurement. The goal is to match the shingle’s dimensions and installation characteristics with the roof’s design so the finished roofing system has the intended coverage, appearance, and performance.